Blog Archives
a very Berry Buttermilk Cake

Oh, I’m so far gone.
One of the things I love about being on holiday is the sudden abundance of great cereal. Cinnamon Toast Crunch? Honey Clusters? Coco Pops and Fruit Loops? I’m putty in their sugary hands.
But for some reason, when I reached the cereal aisle in the reasonably large Cold Storage, I ended up reaching for the only cereal (well, muesli) with no added sugar.

Whaaat??
I think eating healthier has just been ingrained into my brain now (excluding cakes, of course). Or maybe I’m feeling bad for eating all that food in the UK… Either way, it’s a good thing. And it doesn’t even feel like I’m trying to be healthy. I actually really think the muesli tastes good! It’s awesome with some creamy strawberry yoghurt piled on top. Unlike some other cereals –cough cornflakes cough-, it stays all crunchy and has yummy sultanas and nuts in it (For all you nut haters: I don’t care. All the more for me!)
Another thing I love is when fruits suddenly go into season and it so happens that it’s currently cherry season. The US must have had one hell of a bountiful harvest this year because cherries are hitting the shelves at a REALLY low price, even here in Singapore where food is more expensive because they all have to be shipped in (too small to grow food! Haha!).
I had a lot of leftover buttermilk from a chocolate cake that I baked earlier. I was super excited about using buttermilk because they don’t have it in Shanghai, so I use a substitute of lemon juice and milk.
Let me sum this up for you in a simple equation.
Cherries + Buttermilk + Lots of Love
=
a very Berry Buttermilk Cake + More Love
I love this cake. Surprisingly enough, so does my dad, and he doesn’t even really like cake (the horror, I know). I guess it’s because it’s not one of those decadent triple layered chocolate cakes that you have to attack with a big glass of milk. Nope, it’s one of those light, everyday cakes (a great idea, no?). It’s perfect with something so simple as a latte or a cup of tea. This means that it’s totally justifiable to have for breakfast.
Besides, it’s really lovely and soft. The texture is really springy and it just tastes like summer.
Luckily for you, I am all about the simple this summer. Most likely because I’m stuck here with only a whisk and spoon to help me. This means that you have NO excuse not to make this cake! Get your chef hats on, people!
(As usual, recipe at bottom)

Step one. Find some cherries. It doesn’t matter if they’re Rainier cherries or your normal cherries. Heck, they don’t even have to be cherries! Go for any berry you like! Raspberries, blueberries, gooseberries (which don’t actually look like geese) or even a handful of each. Just make sure you wash them!
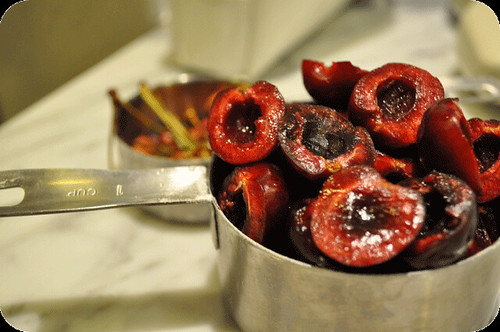
Step two. Start pitting and halving your cherries. There are cherry pitters out there that pop out your cherries nice and whole-like but I feel that it’s an unnecessary piece of equipment that most people will use about twice a decade. Instead, I use a small sharp knife and holding the cherry in my left hand, cut down the centre of cherry all the way around. Then use the knife to pry the halves apart which comes out pretty neat. Then use the point of the knife to dig out the pit. This kind of takes a while, so I wouldn’t start pre-heating your oven until you’re done.
If you’re using strawberries, make sure you hull and half them (quarter if they’re large). As pretty as the green and red would be in a cake, you won’t appreciate it nearly as much when you have a mouthful of strawberry leaves. You’re going to want about one cup of berries. I opted for a heaping cup because I’m all about over-the-top.

Step three.
Preheat your oven to 200 degrees Centigrade (400 Fahrenheit). Then butter and flour a 9 inch round cake tin.
Measure and sift together one cup of flour, and half teaspoon each of baking powder and bicarbonate of soda. Add a quarter teaspoon of salt and whisk them together with…well, a whisk.

Step four. Cream together 56g of butter and two thirds cup of caster sugar. You want to beat them together really well until it’s light and fluffy.
Tip: If you’re beating by hand and you’re getting really annoyed with the bowl shaking and the repetitive sound of it hitting the counter, tightly wrap a kitchen towel around the base. It solves all of your problems (except for the sore arm. Sorry!) 😀
This whole creaming thing is much much easier with a beater or stand mixer, but hey! It’s exercise. But if you’re at home and making this with an appliance, beat it for about 2 minutes.
Okay, this step is super duper important as this is one of the reasons your cake is going to be fluffy. The sugar punches holes into the butter which is why it pales in colour and makes your cake all airy. It pretty much sets up the structure. However, this is not as important in this cake as other cakes because there are other helpful factors.

Step five. Add in a half teaspoon (feel free to add more :D) of vanilla extract. None of that flavouring! PUT DOWN THAT BOTTLE! It’s bad for you! Plus, it doesn’t taste nearly as good.
If you’re adding lemon zest, add in a half teaspoon of the finely grated stuff now! I didn’t because I didn’t have a lemon…or a grater.
Anyway, mix it all up until it’s evenly blended.

Step six. Okay, this is the kind of scary part. It’s easy…but will probably scare you half to death and gross you out at the same time. So basically, just crack your egg into the butter and sugar mixture and beat well.
Why is it scary? Well…because when you start mixing it all up, it kind of ends up looking like…

this.
Yes. It looks absolutely disgusting. I would not eat it, Sam I Am.
Well, don’t give up. Just keep beating it and beating it and beat it *cue Michael Jackson* some more. Until it looks like something more edible. Here, I’ll even hold your hand through the process. (:

See? That looks WAY better. Smells good too. Just like real vanilla.

Step seven. Now you’re going to add your flour mixture and buttermilk into the butter and sugar. You’re going to want to add the flour in three parts, alternating with buttermilk. Flour should be both the first and last in the order. So to make that simple, it goes flour, buttermilk, flour, buttermilk, flour.

So first, add just one third of your flour mixture in. This is called tempering which tempers your mixture so that you don’t overload it with flour which can make it really lumpy…which as you know, I absolutely hate.

Stir the mixture until it’s just combined. That means no overbeating! It’s okay to stop when you still have a couple streaks of flour left.
The main reason you don’t want to overbeat the mixture is because it encourages the formation of gluten and too much of it will give your cakes the same texture as Hagrid’s (delicious, I’m sure) rock cakes.

Then add a quarter cup well-shaken buttermilk. I just measure out a half cup, then splash approximately half of it in. Mix until just combined again.

Now it’s time to add the second third of your flour in! Once again, not being accurate here. Just kind of slop what you think is about right in. Generally, my first addition is the smallest and last is the largest. Mix until well combined!

Add the remaining buttermilk. By the way, the buttermilk is the reason why you can be slack about creaming the sugar and butter together.
Warning! Simple chemistry up ahead!
Baking powder has an acid AND base, making it useful on it’s own, but baking soda (also known as bicarbonate of soda) is basic. Therefore you have a simple acid + base reaction, releasing carbon dioxide which creates the texture of your cake. Buttermilk is acidic, therefore you get double the boost in making a lovely fluffy cake!

For the last time…mix until just combined. Relieved? Me too.

See how yummy it looks now??

You’re almost almost there now! Just plop all of the batter into your prepared pan. It’s thicker than the usual batter, so use a knife or spatula to even it out.

Spread it right up to the edges because otherwise you might get a more domed cake. I don’t know about you, but I don’t like domes unless they’re on cupcakes. Then they’re just cute (:
All you have to do now is arrange your cherries or whatever berries you’re using on the batter. I put my cherries hole facing the ceiling because that way, they’re less likely to sink into the batter. I really want them to stay in their pretty formation. You can do whatever design you want, but I went for an encircled star (:
Maybe you can do a heart for Valentines day or a Christmas tree or just chuck them everywhere.
When you’re finished plonking cherries onto your batter, take 1 1/2 tablespoons of sugar and just sprinkle it evenly all over the surface of your cake. I have forgotten this step both times I’ve baked this cake and ended up risking my hand in 200 degree ovens attempting to sprinkle sugar 10 minutes after baking.

When you’re done designing, put it in your long pre-heated oven and bake! I love how it puffs up so much . It reminds me of clouds 😀 Yummy…cherry flavoured clouds…mmm…
It does look very puffy right now, but it’ll deflate a bit when you take it out of the oven. You’ll be able to see that there is no sugar sprinkled on my cake. This is because I forgot. Yet again. But I realised my pitiful mistake minutes after taking this photo and risked my limbs to correct my mistake. I really love the idea of sprinkling sugar on top though. It makes this yummy golden sugary crust that crunches when you bite into the cake. -sigh-. Heaven.
The recipe said bake for 20-25 minutes, but mine was ready at just 18, so start checking early when it begins to golden on the top.

Aaand, you’re done! Cool it for 10 minutes in the pan, tip it out onto a wire rack for another 10-15 min, then slice and eat!
P.S. This cake is totally waistline friendly!
Cherry Buttermilk Cake
Adapted from Smitten Kitchen
- Ingredients:
- 1 cup all-purpose flour
- 1/2 tsp baking powder
- 1/2 tsp bicarbonate of soda
- 1/4 tsp salt
- 1/2 stick (56g) butter, unsalted
- 2/3 cup + 1 1/2 tbsp caster sugar, divided
- 1/2 tsp vanilla (feel free to add a bit more)
- 1/2 tsp lemon zest, finely grated (optional)
- 1 large egg
- 1/2 cup well shaken buttermilk (see tip)
- 1 cup cherries, halved and pitted
- Method:
- Preheat oven to 200°C (400° F). Butter and flour one 9-inch round pan.
- Whisk together flour, baking powder, bicarbonate of soda and salt.
- Beat together butter and 2/3 cup sugar until pale and fluffy. Approximately 2 minutes by appliance.
- Add vanilla and zest, mixing to combine.
- Crack in egg and beat well until smooth.
- At a low speed, add flour in 3 batches, alternating with buttermilk, beginning and ending with flour. (Flour, buttermilk, flour, buttermilk, flour). Mix until just combined.
- Spoon batter into pan and spread evenly.
- Sprinkles cherries over the top, then sprinkle 1 1/2 tbsp sugar all over the surface.
- Bake 16-20 minutes or until golden. Cool in the pan for 10 minutes, then turn onto rack and cool for 10-15 minutes more.
Tip: If you don’t have buttermilk, it can easily be replaced by 1 tbsp of lemon juice, then filling it with milk up to the 1 cup mark. Let the mixture curdle for 10 minutes, then give it a good stir before using.
